- this article covers how you can setup a local cluster in with kind (not rudely), the next one would cover Microsoft Oauth process.
OIDC?
- Oauth2 is primarily a AUTHORIZATION protocol.(The capitalization is more a reminder to myself than the reader)
- Open IDentity Connect is a AUTHENTICATION protocol that is built on top of Oauth2, effectively making it handle both.
- OIDC is the reason why you get that shiny “Sign in with Google” or Microsoft, or Facebook button in different applications you see.
What is Dex?
- dex is an open source project that aims to simplify authentication for applications.
- Imagine this, you only had to deal with OIDC once (Ideally never would be nice, but its never ideal is it) and someone else took care of every other OIDC providers.
- Dex would talk to other OIDC providers and your application remains agnostic about the different providers, your application only knows about Dex and the tokens Dex gives.
- Dex comes with a local installation too, which means that the source of truth for authentication is its own database, you can interact with this service via grpc calls.
- You can configure the storage options as described here
- Dex’s OIDC is the only protocol your application needs to support, the upstream connector can be anything, LDAP,SAML,OAUTH,here’s the exhaustive list. Connector is basically the place where Dex will go to for getting the user credentials verified. So your app only has to implement OIDC process for Dex, Dex will take care of the rest.
Why do I need dex?
- Imagine this you have built your cool application and it has a standard login page that accepts email and password. But its 2025 now and you feel you need to ease the process by having a google sign in button.
- So you set out on a journey to implement google Oauth2 by going to google console, registering your app, getting your client id and secret and start using it for your app.
- Luck is on your side and your application is growing popular, now you want to on onboard facebook users. But oh no!! your application is hard coded with google endpoints for authentication, so you pile up some technical debt and hardcode your facebook endpoint.
- As days pass you realise you maybe need Microsoft Oauth as well, and you finally realise maybe it was a bad idea to hard code facebook Oauth2, as your authentication endpoints keep increasing and it becomes a hassle to maintain dev,stage, and prod credentials of your application.
But what is OIDC, technically?
Before i summarise briefly how an OIDC flow looks like, lets get on the same page about terminology for clarity.
- your app will be called relying party, think of it like you are relying on Microsoft.
- Microsoft will be called Identity provider.
- your users would be called plain old users.
- token here refers to a JSON Web Token. (they are signed tokens that gets passed around)
- client-id and client-secret are things you would get from the identity provider you have registered against.
- redirect_url, this is the place identity provider will tell the user to go after they have successfully logged in with their creds.
- consent screen, this refers to the time when users login for the first time and identity provider wants to let the user know what the relying party wants to access.
- scope, this defines what relying party will access.for example name, email etc.
Alright then lets get on already:
- user clicks on “Sign in with Microsoft”, this triggers a call to Microsoft with your client-id, redirect_url, scope.
- If the redirect_url matches what was given to the IDP at the time of registration, then the IDP appends a code(url safe alphanumeric string) to the client’s url redirects to our relying party.
- relying party exchanges token against this code.
- now that we have tokens, namely id_tokens,access token and refresh token. you’d give away the id tokens to user but never refresh tokens.
- once you have the id-tokens, your frontend can now be trusted to be who they claim to be. yayy!!!
the id tokens look something like this:
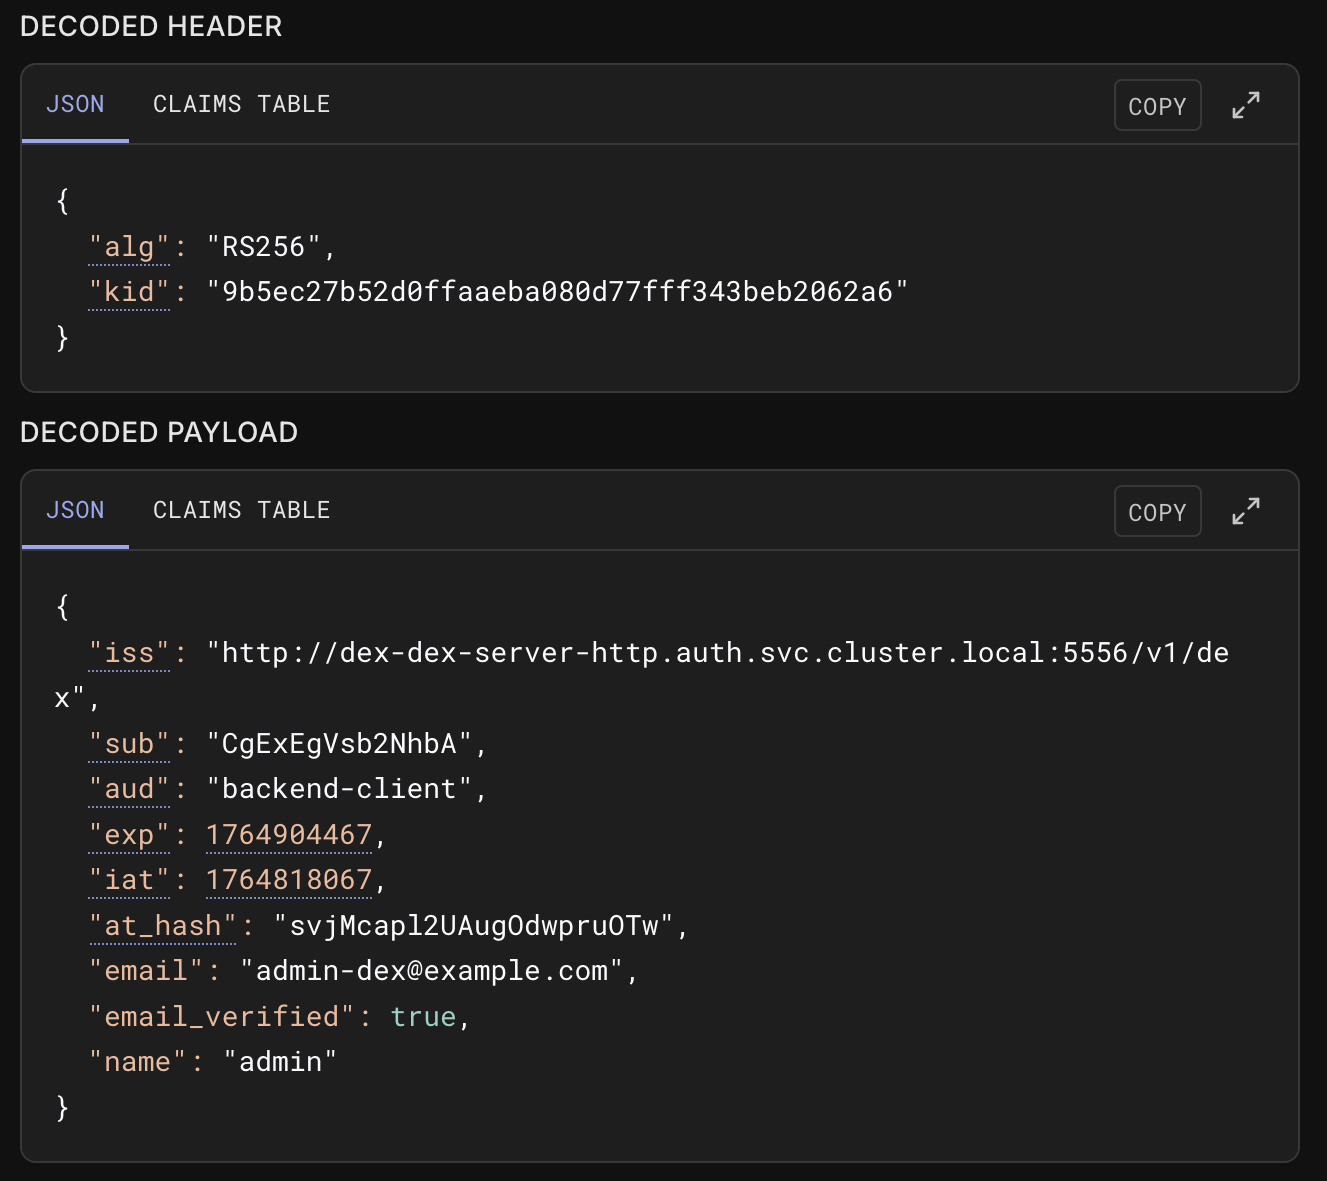
- jwt.io would be your goto page for your jwt needs.
- NOTE:
- Always share a opaque session id string that would be tied to your refresh token, never share your refresh tokens as that would mean client can keep refreshing their tokens till refresh tokens expire, which are usually like week long.
- access tokens are for applications to access resources that are consented to be accessed by the user like email,or your google photos.
Local connector
- local connector means that Dex will maintain its own database.
- the process to setup connector mostly remains the same regardless of which Oauth2 provider you choose to go with, but the process would vary for LDAP,SAML connectors.
- you would get client-id and client-secret, while choosing redirect url of your own liking and scopes that you might need.
Getting the tools
you would need these cli tools
You can find the code for all of this here
Architecture
We will deploy our Dex instance behind a Kong gateway in a kind cluster, reason being that Dex is built for production, so you’d follow similar patterns when you use it in your actual project.
once you understand how to deploy locally in kind, production is merely some endpoint changes away.
    ┌──────────────────────────────────────────────────────────────────────┐
    │ Docker                                                               │
    │    ┌──────────────┐       ┌─────────────────────────────────────┐    │
    │    │ control-plane│       │worker node                          │    │
    │    │  KinD        │       │ ┌────┐      ┌────┐   ┌─────────┐    │    │
    │    └──────────────┘       │ │KONG│      │DEX │   │POSTGRES │    │    │
    │                           │ └────┘      └────┘   └─────────┘    │    │
    │                           │                                     │    │
    │                           └─────────────────────────────────────┘    │
    │                                                                      │
    └──────────────────────────────────────────────────────────────────────┘
    ```
we will also use helmfile with format to deploy our application, for context this is like killing a mosquito with a nuke, because helmfile shines when you have a complex setup for your application, unlike our application, But we will still use this because its fun to learn complex things easily.
Configurations
cluster config
- following helmfile describes the list of all the things kubernetes needs to install for our application.
environments:
  default:
    values:
      - values.yaml
---
repositories:
  - name: kong
    url: https://charts.konghq.com

releases:
  - name: kong
    namespace: kong
    createNamespace: true
    chart: kong/kong
    version: ~2.51.0  # or latest stable, check via `helm search repo kong/kong`
    set:
      - name: ingressControllerCRDs
        value: false
    values:
      - kong-values.yaml

  - name: postgres
    namespace: postgres
    labels:
      app: postgres
      tier: core
    version: 16.0.3
    chart: oci://registry-1.docker.io/bitnamicharts/postgresql
    set:
    - name: nameOverride
      value: postgres
    - name: auth.database
      value: ps_db
    - name: auth.username
      value: {{ .Values.postgres.user }}
    - name: auth.password
      value: {{ .Values.postgres.pass }}
    - name: image.repository
      value: bitnamilegacy/postgresql

  - name: dex
    namespace: auth
    createNamespace: true
    chart: ./charts/dex
    values:
      - dex-values.yaml

  - name: backend
    namespace: auth
    createNamespace: false
    chart: ./charts/backend
    values:
      - backend-values.yaml
    needs:
      - auth/dex

  - name: frontend
    namespace: frontend
    createNamespace: true
    chart: ./charts/frontend
    values:
      - frontend-values.yaml
charts?
- For any application to be deployed in your cluster, you need charts, charts are yaml files of deployment, service, ingress at its minimum. They describe how your pod would be behaving in the cluster. Pod is where your docker container is hosted, effectively your app would be running in a pod.
- Deployment is a yaml file that describes how much resources your application wants, resources could be pods, cpu
- Service is an abstraction for the application that will run in a production.
- Ingress is the biggest culprit for when your pod is running but your requests wont be processed, its because none of your request are actually going to the pod.
- In ingress your incoming rules need to be setup explicitly, therefore your request never reached the pod if no ingress rules were defined.
- Here we’re telling
helmfilethat hey, please install dex, kong, frontend and backend apps, and their associated configurable values are present in thevalue.yaml.
dex config
# Dex chart values - matching charts/dex/values.yaml structure

global:
  # Database configuration for Dex
  database:
    host: postgres.postgres.svc.cluster.local
    port: 5432
    ssl:
      mode: disable
    createDatabase: true
    username: dex

  # Database secret for password
  databaseSecret:
    name: postgres
    key: password

  # Ingress configuration
  ingress:
    ingressClassName: kong
    host: localhost
    controllerUrl: "http://dex-dex-server-http.auth.svc.cluster.local:5556" # this url is discoverable on the inside of cluster.
    annotations: {}

# Dex database name
database:
  database: ps_db

# HTTP port for Dex service
httpPort: 5556

# GRPC port for internal communication
internalGrpcPort: 8082

# Enable password database (local authentication)
enablePasswordDb: true

# OAuth2 configuration
oauth2:
  passwordConnector:
    enable: true
    value: local
  responseTypes: ["code"]

# Static passwords for local authentication
staticPasswords:
  - email: "admin-dex@example.com"
    hash: "JDJhJDEyJEwycXBiTjRjNThHTHd1YXo4Wnhoa2UvSzF1cHMvWnVyRnhvNU9iRnAxQWhILmllNGdUNXZD" # bcrypt hash of "password"
    username: "admin"
    userID: "1"

# Additional static clients for OAuth2
additionalStaticClients:

  - id: backend-client
    public: false
    secret: "backend-secret-change-in-production"
    name: "Backend Auth Service"
    redirectURIs:
      - "http://localhost:8000/api/auth/callback"

# Resource limits
resources:
  requests:
    cpu: "100m"
    memory: "128Mi"
  limits:
    cpu: "250m"
    memory: "256Mi"

# Liveness probe configuration
livenessProbe:
  enabled: true
  initialDelaySeconds: 5
  periodSeconds: 10
  timeoutSeconds: 3
  successThreshold: 1
  failureThreshold: 5

# Replica count
replicaCount: 1

# Environment variables for dex container
dex:
  env:
    - name: PASSWORD_ENV_VAR
      valueFrom:
        secretKeyRef:
          name: postgres
          key: password
DEMO
- in the next article we will cover how you can onboard Microsoft Oauth2 with dex.
- PS: AI was used for proof reading and ensuring technical accuracy but never to generate the sentences you read.